

使用Hexo搭建自己的博客
本文为新手保姆级 Hexo 博客搭建教程,详细记录 NodeJS、Git、Hexo 框架的安装,Stellar 主题配置,以及 Artalk 评论、Lsky 图床部署和友链页面搭建,助力新手快速上手,加入博客圈,用文字留存热爱。
视频教程
前言
声明:此教程为新手保姆级教程,可能会有对您无用的废话,请移步至右上角菜单自行跳转需要的部分
写这篇教程的目的也是总结我的踩坑日记,帮助更多的新手朋友能接触到博客的圈子
全篇使用到的工具已上传至百度网盘 | 提取码: 3z8c 夸克网盘 蓝奏云 | 密码:3ald
①* 本文默认本地开发环境为
Windows10/11 x64②* 本文视频教程使用系统为Windows10 x64
③* 本文默认服务器部署环境为Ubuntu22.04 LTS
④* 大部分下载失败都是网络问题,需自行寻找解决方案
Hexo框架 *①
01.安装核心工具NodeJS和Git
操作步骤
1.1 .安装 Node.js
- 官网:Download | Node.js
- 版本建议: Hexo 要求 NodeJS 版本不低于
10.13,建议使用 12.0 及以上版本的 LTS 版 - 安装注意: 安装程序时,请确保勾选
Add to PATH选项,这会让系统能随时在命令行中找到NodeJS
1.2 .安装 Git
- 官网:Downloads | Git
- 下载注意: 请根据您的CPU架构选择版本,大部分人选择
Git for Windows/x64 Setup即可
1.3. 检查安装状态
随意位置打开CMD,依次运行命令:
node -v
npm -v
git -v
若看到返回版本信息,证明安装成功
如下图:
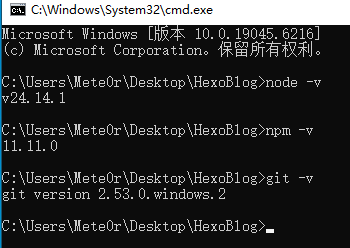 版本检查
版本检查
02.安装Hexo博客框架
2.1. 安装Hexo
运行如下命令:
npm install hexo-cli -g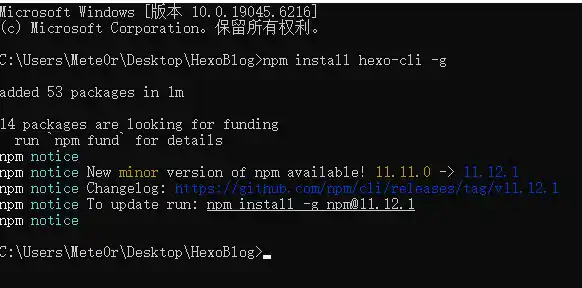
2.2. 创建博客本地开发环境文件夹
注意:这个文件夹内的文件不要放在公开类型的仓库中,若您配置了需要Token的项目,会有Token泄露风险
在你需要的位置创建一个文件夹(名称不要有中文)例如./HexoBlog
在地址栏双击运行cmd
运行如下命令:
hexo init提示:若出现‘command not found’,就在前面加上npx,如:npx hexo init
此步是从Github下载资源 *④
完成则如下图所示:
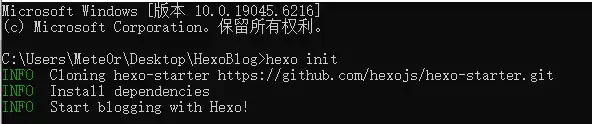 hexo init
继续输入:
npm install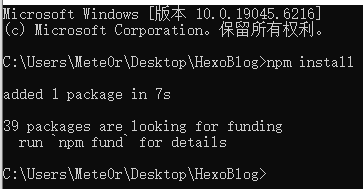 npm install
这个时候你的博客就已经下载完成了,只不过刚开始还是默认主题,并且尚且没有配置任何个性化的项目
你可以用hexo server命令启动博客,访问http://localhost:4000即可看到博客(Ctrl+C结束程序)
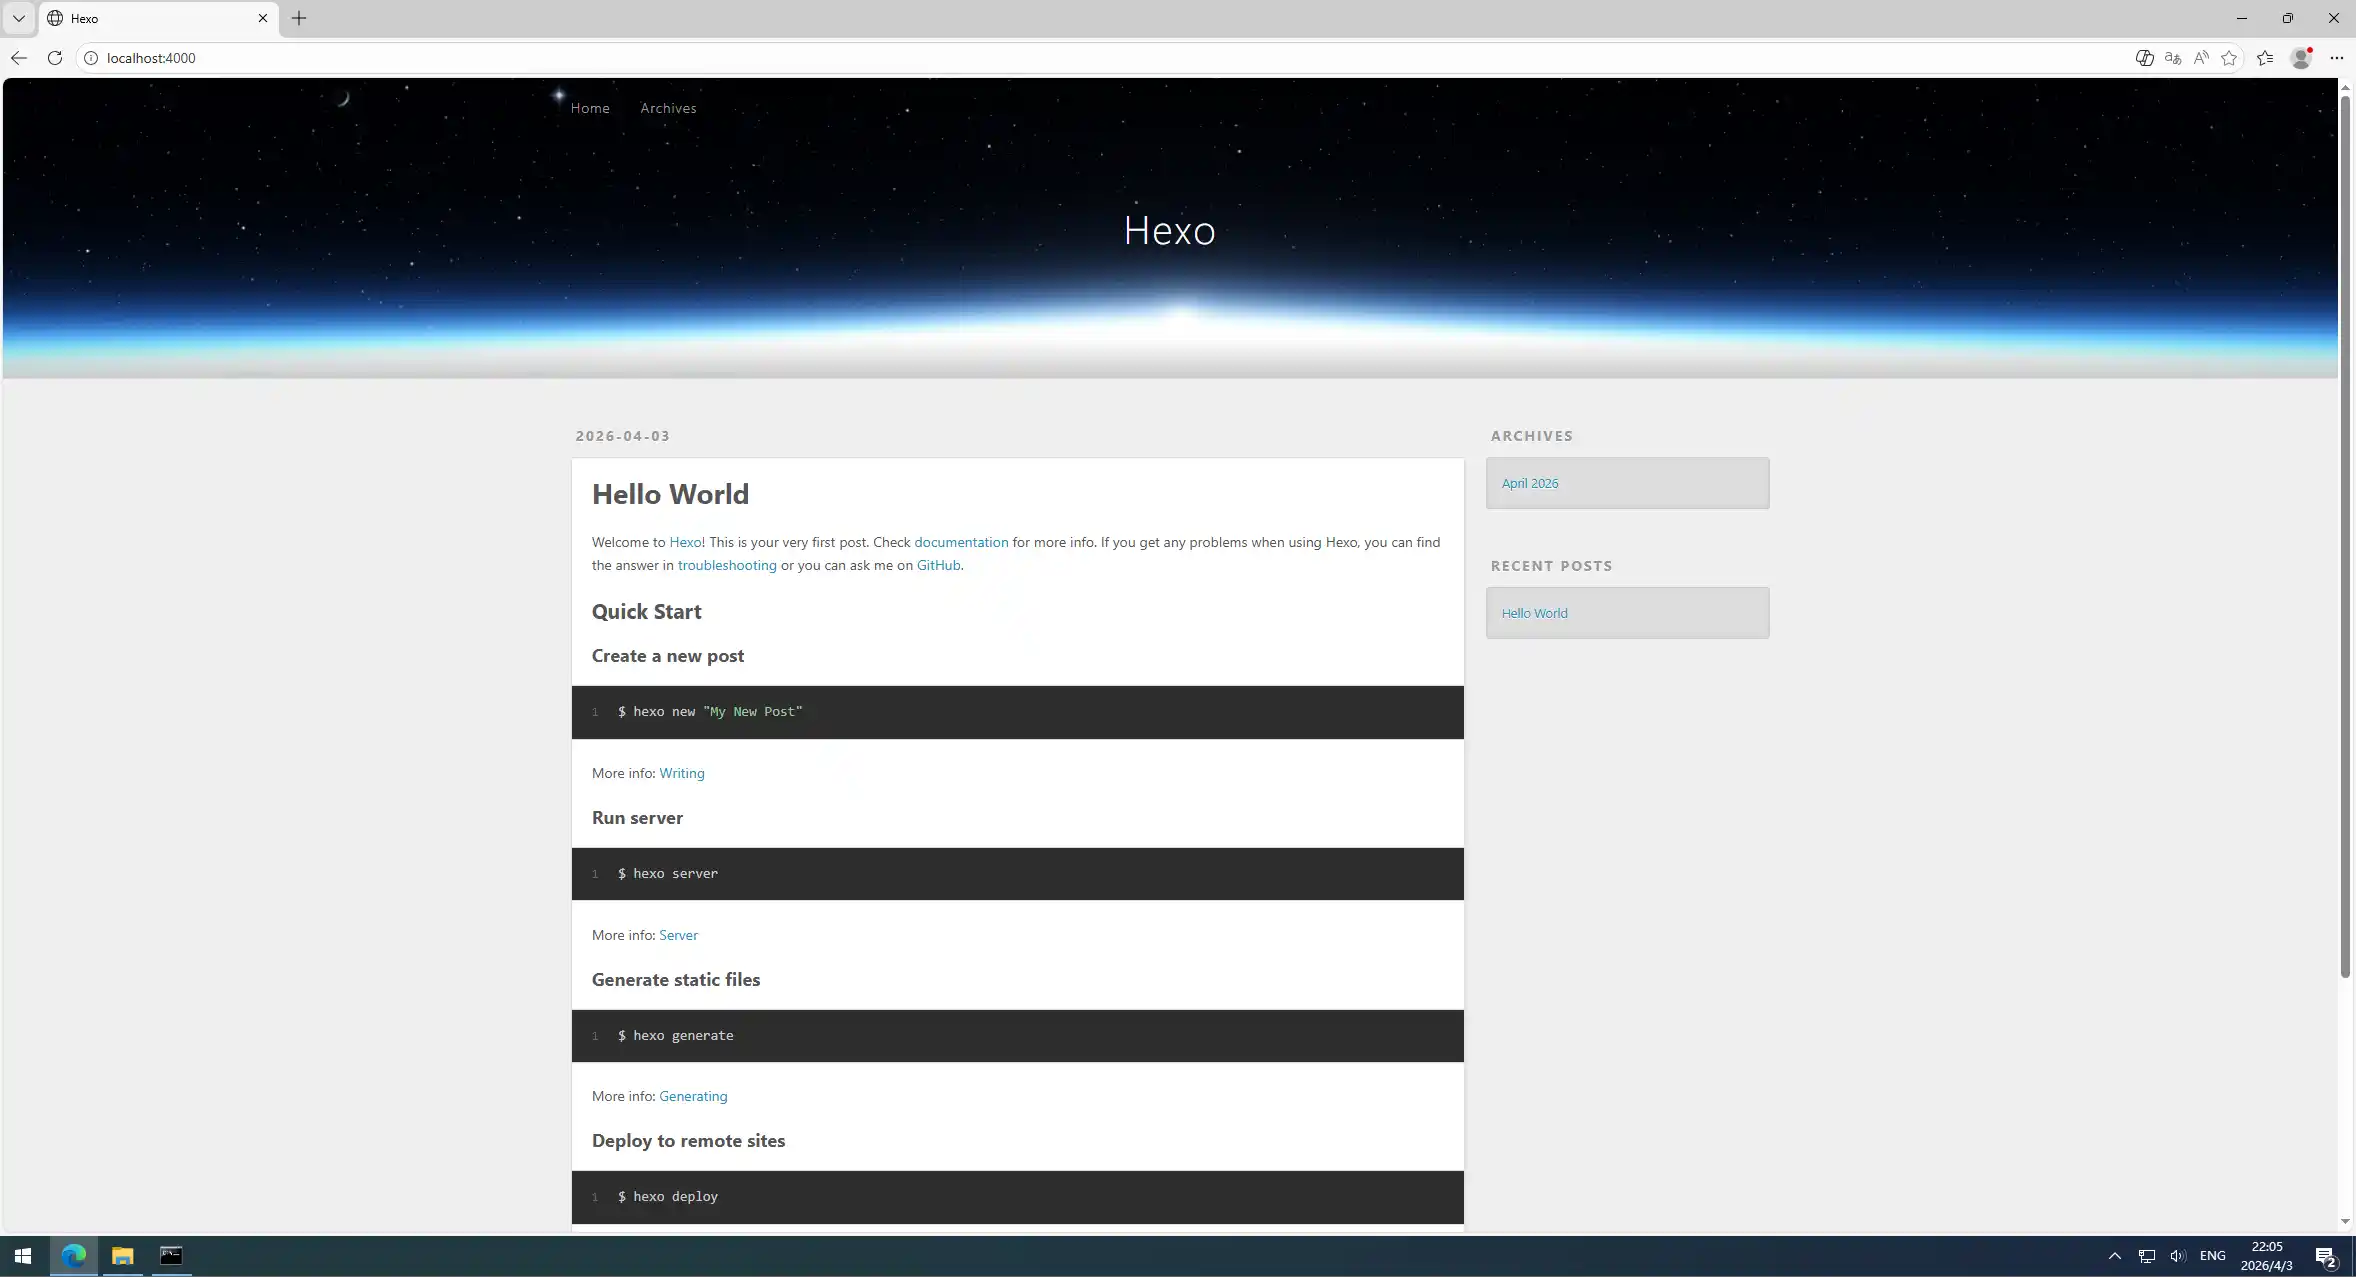 hexo server
2.3. 下载你喜欢的博客主题
这里以我自己用的Hexo - Stellar主题为例
03. 安装主题并修改配置文件
3.1. 安装主题
在地址栏双击运行cmd
输入命令:
npm i hexo-theme-stellar --save从 Hexo 7.x 版本开始,通过 npm install 安装的主题会存放在 node_modules 目录下,而不再是 themes 文件夹
3.2. 修改配置文件
3.2.1. 下载VSCode | The open source AI code edito
- 官网:Download | VSCode
- 安装:全部无脑下一步即可,建议选择SSD硬盘安装,以加速启动速度
- 插件推荐:Bracket Pair Color DLW / indent-rainbow / Markdown Preview Enhanced / Dracula Theme Official
3.2.2. 更改VSCode语言为简体中文
- 点击左侧插件库图标
- 搜索
Chinese - 安装
Chinese (Simplified) 简体中文 - 重启VSCode
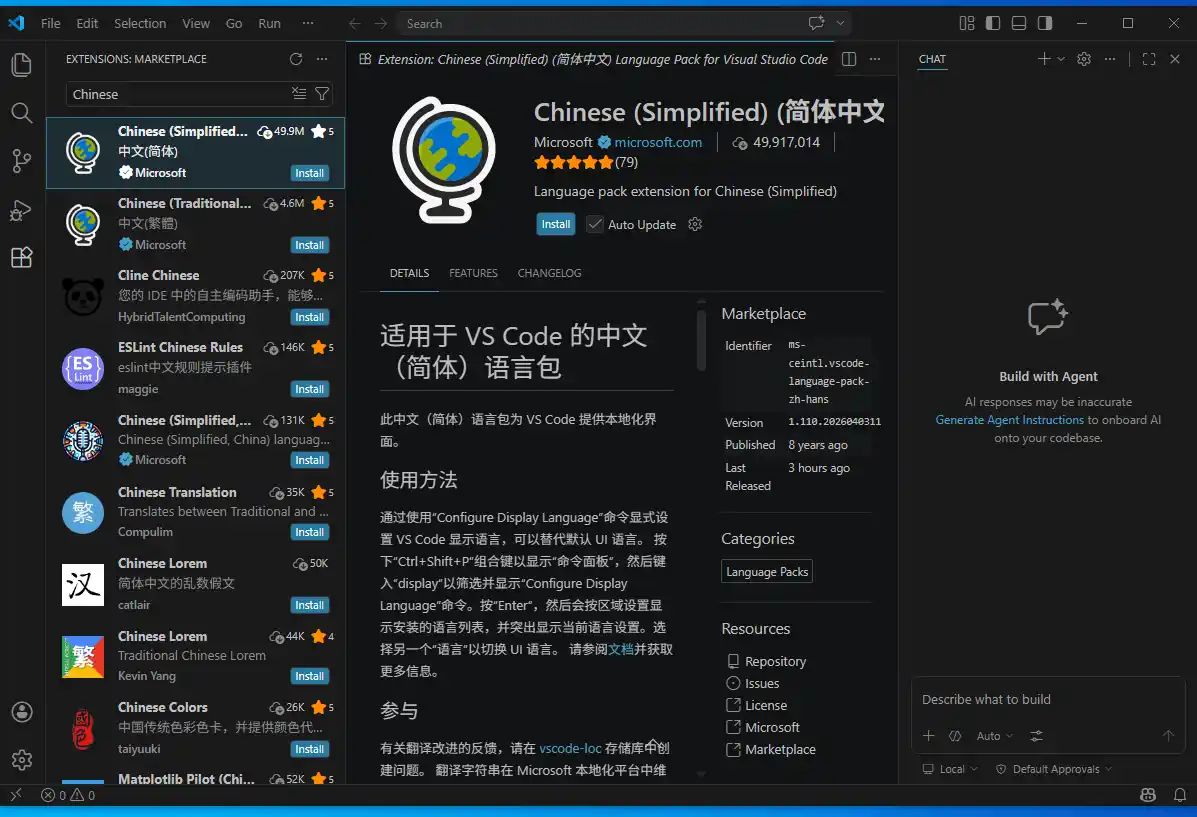
3.2.3. 修改Hexo配置文件
使用VSCode打开博客项目文件夹
选中_config.yml文件
可以直接粘贴替换为以下代码:
_config.yml
# Hexo Configuration
## Docs: https://hexo.io/docs/configuration.html
## Source: https://github.com/hexojs/hexo/

# Mete0r注释版本,Site部分并未修改原始内容,请自行更改,仅更改了Theme项目为Stellar,博客文章: https://www.xscnet.cn/posts/p3520260403/

# Site
title:  #你的博客标题
subtitle: '' #你的博客副标题
description: '' #你的博客简介
favicon: "" #网站ICON
avatar: "" #你的头像
keywords: #关键词
author: John Doe #作者
language: en #语言,国人可以填写zh-CN
timezone: '' #时区,国人可以填写Asia/Shanghai

# URL
## Set your site url here. For example, if you use GitHub Page, set url as 'https://username.github.io/project'
url: http://example.com #你的站点URL
permalink: :year/:month/:day/:title/ #文章链接格式,Mete0r使用的是: posts/:title/
permalink_defaults: #从这往下到第100行可以不用更改,如您需要自定义,可以咨询AI
pretty_urls:
  trailing_index: true # Set to false to remove trailing 'index.html' from permalinks
  trailing_html: true # Set to false to remove trailing '.html' from permalinks

# Directory
source_dir: source
public_dir: public
tag_dir: tags
archive_dir: archives
category_dir: categories
code_dir: downloads/code
i18n_dir: :lang
skip_render:

# Writing
new_post_name: :title.md # File name of new posts
default_layout: post
titlecase: false # Transform title into titlecase
external_link:
  enable: true # Open external links in new tab
  field: site # Apply to the whole site
  exclude: ''
filename_case: 0
render_drafts: false
post_asset_folder: false
relative_link: false
future: true
syntax_highlighter: highlight.js
highlight:
  line_number: true
  auto_detect: false
  tab_replace: ''
  wrap: true
  hljs: false
prismjs:
  preprocess: true
  line_number: true
  tab_replace: ''

# Home page setting
# path: Root path for your blogs index page. (default = '')
# per_page: Posts displayed per page. (0 = disable pagination)
# order_by: Posts order. (Order by date descending by default)
index_generator:
  path: ''
  per_page: 10
  order_by: -date

# Category & Tag
default_category: uncategorized
category_map:
tag_map:

# Metadata elements
## https://developer.mozilla.org/en-US/docs/Web/HTML/Element/meta
meta_generator: true

# Date / Time format
## Hexo uses Moment.js to parse and display date
## You can customize the date format as defined in
## http://momentjs.com/docs/#/displaying/format/
date_format: YYYY-MM-DD
time_format: HH:mm:ss
## updated_option supports 'mtime', 'date', 'empty'
updated_option: 'mtime'

# Pagination
## Set per_page to 0 to disable pagination
per_page: 10
pagination_dir: page

# Include / Exclude file(s)
## include:/exclude: options only apply to the 'source/' folder
include:
exclude:
ignore:

# Extensions
## Plugins: https://hexo.io/plugins/
## Themes: https://hexo.io/themes/
theme: stellar #从这里开始改动,设置你的主题

# Deployment
## Docs: https://hexo.io/docs/one-command-deployment
deploy:
  type: ''
3.2.4. 配置主题
- 在博客项目文件夹中运行以下命令以创建主题的默认配置文件:
copy .\node_modules\hexo-theme-stellar\_config.yml .\_config.stellar.yml- 配置主题配置文件
.\_config.stellar.yml
此项目由于自定义程度过高,不予详细介绍,请自行根据注释修改,如有任何问题,欢迎在评论区进行提问
_config.stellar.yml
######## Stellar info ########
stellar:
  version: '1.33.1'
  homepage: 'https://xaoxuu.com/wiki/stellar/'
  repo: 'https://github.com/xaoxuu/hexo-theme-stellar'
  main_css: /css/main.css
  main_js: /js/main.js


######## head tags ########
preconnect:
  # - https://gcore.jsdelivr.net
  # - https://gcore.jsdelivr.net
  # - https://unpkg.com

# 一旦设置源站地址,非源站地址将不会被SEO收录,并且访问时弹出提示
# 如果访问地址不在备用站主机列表,则警告信息为非法克隆
canonical:
  originalHost: # 主站点域名主机,例如 xaoxuu.com
  officialHosts: # 官方主机列表,每行一个,例如 xaoxuu.vercel.app
    - localhost
    - example.com # 这个要填写你的域名哦,要不会触发非法克隆提示

open_graph:
  enable: true
  twitter_id: # for open_graph meta

structured_data:
  links: [] # your social links.


######## Sidebar ########
# 左上角显示的 logo 区域,包含图标、大标题、副标题
logo:
  avatar: '[{config.avatar}](/about/)' # you can set avatar link in _config.yml or '[https://xxx.png](/about/)'
  title: '[{config.title}](/)' # you can set html tag like: '[<img no-lazy height="32px" src="xxx"/>](/)'
  subtitle: '{config.subtitle}' # '文字1 | 文字2' (鼠标放上去会切换到文字2)

# 侧边栏主功能导航菜单
menubar:
  columns: 4 # 一行多少个
  items: # 可按照自己需求增加,符合以下格式即可
    # id: 页面中高亮的 menu_id
    # theme: 高亮时的颜色,仅 svg 中 fill="currentColor" 时有效
    # icon: 支持 svg/img 标签,可以定义在 icons.yml 文件中,也支持外部图片的 URL
    # title: 标题
    # url: 点击跳转到哪,支持相对路径和绝对路径
    # - id: post
    #   theme: '#1BCDFC'
    #   icon: solar:documents-bold-duotone
    #   title: 博客
    #   url: /
    # - id: wiki
    #   theme: '#3DC550'
    #   icon: solar:notebook-bookmark-bold-duotone
    #   title: 文档
    #   url: /wiki/
    # - id: explore
    #   theme: '#FA6400'
    #   icon: solar:planet-bold-duotone
    #   title: 探索
    #   url: /explore/
    # - id: social
    #   theme: '#F44336'
    #   icon: solar:chat-square-like-bold-duotone
    #   title: 社交
    #   url: /friends/


######## Main ########
# 站点主结构树
site_tree:
  # -- 列表类页面 -- #
  # 主页配置
  home:
    leftbar: welcome, recent
    rightbar:
  # 博客列表页配置
  index_blog:
    base_dir: blog # 只影响自动生成的页面路径
    menu_id: post # 未在 front-matter 中指定 menu_id 时,layout 为 post 的页面默认使用这里配置的 menu_id
    leftbar: welcome, recent # for categories/tags/archives
    rightbar:
    nav_tabs:  # 近期发布 分类 标签 专栏 归档 and ...
      # '朋友文章': /friends/rss/
  # 博客专栏列表页配置
  index_topic:
    base_dir: topic # 只影响自动生成的页面路径
    menu_id: post # 未在 front-matter 中指定 menu_id 时,layout 为 topic 的页面默认使用这里配置的 menu_id
  # 文档列表页配置
  index_wiki:
    base_dir: wiki # 只影响自动生成的页面路径
    menu_id: wiki # 未在 front-matter 中指定 menu_id 时,layout 为 wiki 的页面默认使用这里配置的 menu_id
    leftbar: related, recent # for wiki
    rightbar:
    nav_tabs:
      # 'more': https://github.com/xaoxuu
  # -- 内容类页面 -- #
  # 博客文章内页配置
  post:
    menu_id: post # 未在 front-matter 中指定 menu_id 时,layout 为 post 的页面默认使用这里配置的 menu_id
    leftbar: related, recent # for pages using 'layout:post'
    rightbar: ghrepo, toc
  # 博客专栏文章内页配置
  topic:
    menu_id: post
  # 文档内页配置
  wiki:
    menu_id: wiki # 未在 front-matter 中指定 menu_id 时,layout 为 wiki 的页面默认使用这里配置的 menu_id
    leftbar: tree, related, recent # for wiki
    rightbar: ghrepo, toc
  # 笔记本列表页配置
  notebooks:
    base_dir: notebooks # 笔记本列表页的路径。以及未指定 base_dir 的笔记本的路径前缀。
    menu_id: notebooks # 笔记本列表页高亮的主导航栏菜单按钮。
    # 笔记本列表页的左侧栏和右侧栏。
    leftbar: recent # recent within all notebooks
    rightbar: null
  # 笔记列表页配置
  notes:
    # 笔记列表页和笔记页高亮的主导航栏菜单按钮。
    # 可以在笔记本 yaml 的 menu_id 字段中覆盖此参数。
    # 可以在笔记的 front-matter/menu_id 中覆盖此参数。
    menu_id: notebooks
    # 笔记列表页的左侧栏和右侧栏。可以在笔记本 yaml 的 leftbar 和 rightbar 字段中覆盖此参数。
    leftbar: tagtree, recent # recent of current notebook
    rightbar: null
  # 笔记页配置
  note:
    # 笔记页的左侧栏和右侧栏
    # 可以在笔记本 yaml 的 note_leftbar 和 note_rightbar 字段中覆盖此参数。
    # 可以在笔记的 front-matter/leftbar 和 rightbar 字段中覆盖此参数。
    leftbar: tagtree, recent # recent of current notebook
    rightbar: toc
  # 作者信息配置
  author:
    base_dir: author # 只影响自动生成的页面路径
    menu_id: post
    leftbar: recent, timeline
    rightbar: timeline
  # 错误页配置
  error_page:
    menu_id: post
    '404': '/404.html'
    leftbar: recent, timeline
    rightbar: timeline
  # 其它自定义页面配置 layout: page
  page:
    leftbar: recent
    rightbar: toc


######## Notebook ########
notebook:
  # 如果没有指定 excerpt 和 description,将自动取多长的内容作为文章摘要。
  auto_excerpt: 128
  # 可以为某个 tag 设定图标(显示在标签树中)。
  tagcons:
    '': solar:hashtag-square-bold
  # 每页显示多少篇笔记。0 表示不分页,null 则 fallback 到 hexo 的配置。
  # 可以在笔记本 yaml 的 per_page 字段中覆盖此参数。
  per_page: null
  # 笔记的排序方式。默认按照 updated 降序排序。
  # 可以在笔记本 yaml 的 order_by 字段中覆盖此参数。
  # 注意:置顶的笔记会始终排在最前面。
  # 在 front-matter 中设置 pin:true|number 或 sticky:true|number 来置顶。
  order_by: -updated
  # 是否在笔记页面显示许可协议。false 表示不显示。true 表示沿用主题许可协议内容。也可以给定具体的文本指定协议内容。
  # 可以在笔记本 yaml 的 license 字段中覆盖此参数。
  # 可以在笔记的 front-matter/license 中覆盖此参数。
  license: false
  # 是否在笔记页面显示分享按钮。
  # 可以在笔记本 yaml 的 share 字段中覆盖此参数。
  # 可以在笔记的 front-matter/share 中覆盖此参数。
  share: false


######## Article ########
article:
  # 文章类型,决定布局风格,可以在 front-matter/topic/wiki 中覆盖此参数
  type: tech # tech: 默认技术类文章, story: 图文类文章,文字和段落间增距大
  # 缩进两个文字宽度,适合文字类博客,可以在 front-matter/topic/wiki 中覆盖此参数
  indent: # true / false
  # 封面图宽高比
  cover_ratio: 2
  # 文章内横幅宽高比
  banner_ratio: 2.5
  # 如果没有指定横幅,是否根据 tags 作为关键词搜索横幅图片?
  auto_banner: false # search from https://source.unsplash.com/
  # 如果没有指定 excerpt 和 description,将自动取多长的内容作为文章摘要?
  auto_excerpt: 128
  # 分类颜色
  category_color:
    '探索号': '#f44336'
  # 文章许可协议
  license: '本文采用 [署名-非商业性使用-相同方式共享 4.0 国际](https://creativecommons.org/licenses/by-nc-sa/4.0/) 许可协议,转载请注明出处。'
  # 分享
  share: # [wechat, weibo, email, link]
  # 相关文章,需要安装插件 (for layout: post)
  # npm i hexo-related-popular-posts
  related_posts:
    enable: false
    max_count: 5

search:
  service: local_search # local_search, algolia_search, todo...
  local_search: # 在 front-matter 中设置 indexing:false 来避免被搜索索引
    field: all # post, page, all
    path: /search.json # 搜索文件存放位置
    content: true # 是否搜索内容
    skip_search:  # 指定 path 中的内容不被搜索。
  algolia_search: # Docsearch https://docsearch.algolia.com/apply/ 申请
    appId:
    apiKey:
    indexName:
    js: https://gcore.jsdelivr.net/algoliasearch/3/algoliasearch.min.js


######## Comments ########
comments:
  service: # beaudar, utterances, giscus, twikoo, waline, artalk
  comment_title: 快来参与讨论吧~
  lazyload: false # true / false
  custom_css: # artalk,twikoo,... 可以为没有全局启用的评论加载自定义样式
  # beaudar
  # https://beaudar.lipk.org/
  beaudar:
    repo: xxx/xxx
    issue-term: pathname
    issue-number:
    theme: preferred-color-scheme
    label:
    input-position: top # top/bottom 评论框位置
    comment-order: desc # desc 排序
    keep-theme: # true/false
    loading: false
    branch: main
  # utterances
  # https://utteranc.es/
  utterances:
    repo: xxx/xxx
    issue-term: pathname
    issue-number:
    theme: preferred-color-scheme
    label:
  # giscus
  # https://giscus.app/zh-CN
  giscus:
    src: https://giscus.app/client.js
    data-repo: xxx/xxx # [在此输入仓库]
    data-repo-id: # [在此输入仓库 ID]
    data-category: # [在此输入分类名]
    data-category-id:
    data-mapping: pathname
    data-strict: 0
    data-reactions-enabled: 1
    data-emit-metadata: 0
    data-input-position: top # top, bottom
    data-theme: preferred_color_scheme
    data-lang: zh-CN
    data-loading: # lazy
    crossorigin: anonymous

  # Twikoo
  # https://twikoo.js.org/
  twikoo:
    js: https://gcore.jsdelivr.net/npm/twikoo@1.6/dist/twikoo.all.min.js # 建议锁定版本
    envId: https://xxx # vercel函数

  # Waline
  # https://waline.js.org/
  waline:
    js: https://gcore.jsdelivr.net/npm/@waline/client@3.1/dist/waline.js
    css: https://gcore.jsdelivr.net/npm/@waline/client@3.1/dist/waline.css
    meta_css: https://gcore.jsdelivr.net/npm/@waline/client@3.1/dist/waline-meta.css
    # Waline server address url, you should set this to your own link
    serverURL: https://waline.vercel.app
    # If false, comment count will only be displayed in post page, not in home page
    commentCount: true
    # Pageviews count, Note: You should not enable both `waline.pageview` and `leancloud_visitors`.
    pageview: false
    # Custom emoji
    # emoji:
    #   - https://unpkg.com/@waline/emojis@1.1.0/weibo
    #   - https://unpkg.com/@waline/emojis@1.1.0/alus
    #   - https://unpkg.com/@waline/emojis@1.1.0/bilibili
    #   - https://unpkg.com/@waline/emojis@1.1.0/qq
    #   - https://unpkg.com/@waline/emojis@1.1.0/tieba
    #   - https://unpkg.com/@waline/emojis@1.1.0/tw-emoji
    #   - https://unpkg.com/@waline/emojis@1.1.0/bmoji
    # 设置自己的图床服务,替换默认的 Base 64 编码嵌入(有体积大小限制),在评论中上传图片更加方便
    # imageUploader:
      # 适配了兰空图床V1、V2版本
      # 以兰空图床V1为例,下列填写内容为:
      # fileName: file
      # tokenName: Authorization
      # api: https://xxxxxx/api/v1/upload
      # token: Bearer xxxxxxxxxxxxxx
      # resp: data.links.url
      # 以兰空图床V2为例,下列填写内容为:
      # fileName: image
      # tokenName: token
      # api: https://xxxxxx/api/upload
      # token: xxxxxxxxxxxxxx
      # resp: data.url
    #   fileName: # 根据版本二选一
    #   tokenName: # 根据版本二选一
    #   api: # 图床 api 地址
    #   token: # 图床验证
    #   resp: # 图片地址返回值的字段

  # Artalk
  # https://artalk.js.org/
  artalk:
    css: https://unpkg.com/artalk@2.9/dist/Artalk.css
    js: https://unpkg.com/artalk@2.9/dist/Artalk.js
    server: # 后端服务地址
    site: '' # 站点名称
    darkMode: auto # 其它模式都有问题,慎用,否则后果自负
    fancybox: true # 是否为评论区启用 fancybox
    # artalk 有三类图片:1.上传至服务端 2.上传至服务端后利用upgit上传至图床 3.前端上传至图床(本配置为此类)
    # 配置此项时将覆盖服务端上传能力
    imageUploader:
      # 以兰空图床为例,下列填写内容为:
      # api: 'https://xxxxxx/api/v1/upload' # 图床上传地址
      # token: 'Bearer xxxxxxxxxxxxxx' # 图床验证
      # resp: 'data.links.url' # 图片地址返回值的字段


######## Footer ########
footer:
  social:
    # github:
    #   icon: '<img src="https://gcore.jsdelivr.net/gh/cdn-x/placeholder@1.0.12/social/08a41b181ce68.svg"/>'
    #   url: /
    # music:
    #   icon: '<img src="https://gcore.jsdelivr.net/gh/cdn-x/placeholder@1.0.12/social/3845874.svg"/>'
    #   url: /
    # unsplash:
    #   icon: '<img src="https://gcore.jsdelivr.net/gh/cdn-x/placeholder@1.0.12/social/3616429.svg"/>'
    #   url: /
    # comments:
    #   icon: '<img src="https://gcore.jsdelivr.net/gh/cdn-x/placeholder@1.0.12/social/942ebbf1a4b91.svg"/>'
    #   url: /about/#comments
  sitemap:
    # - title: 博客
    #   items:
    #     - '[近期发布](/)'
    #     - '[分类](/blog/categories/)'
    #     - '[标签](/blog/tags/)'
    #     - '[归档](/blog/archives/)'
    # - title: 项目
    #   items:
    #     - '[xxx](/)'
    #     - '[xxx](/)'
    #     - '[xxx](/)'
    #     - '[xxx](/)'
    # - title: 社交
    #   items:
    #     - '[xxx](/)'
    #     - '[xxx](/)'
    #     - '[xxx](/)'
    #     - '[xxx](/)'
    # - title: 关于
    #   items:
    #     - '[xxx](/)'
    #     - '[xxx](/)'
    #     - '[xxx](/)'
    #     - '[xxx](/)'
  content: | # 支持 Markdown 格式
    本站由 [{author.name}](/) 使用 [{theme.name} {theme.version}]({theme.tree}) 主题创建。
    本博客所有文章除特别声明外,均采用 [CC BY-NC-SA 4.0](https://creativecommons.org/licenses/by-nc-sa/4.0/) 许可协议,转载请注明出处。
  # 主题用户越多,开发者维护和更新的积极性就越高,如果您喜欢本主题,请在适当的位置显示主题信息和仓库链接以表支持。


######## Tag Plugins ########
tag_plugins:
  # {% box %} / {% note %}
  note:
    default_color: '' # light, dark, red, orange, yellow, green, cyan, blue, purple, warning, error
    border: true # true / false
  # {% checkbox %}
  checkbox:
    interactive: false # enable interactive for user
  # {% quot %}
  quot:
    default: # 可以自行配置多种图标方案,支持icons.yml中配置的图片key,也支持直接设置svg/png等文件链接
      prefix: bxs:quote-left
      suffix: bxs:quote-right
    hashtag:
      prefix: solar:hashtag-square-bold
    question:
      prefix: ph:seal-question-fill
  # {% emoji %}
  emoji:
    default: https://gcore.jsdelivr.net/gh/cdn-x/emoticons@3.1/qq/{name}.gif
    twemoji: https://gcore.jsdelivr.net/gh/twitter/twemoji/assets/svg/{name}.svg
    qq: https://gcore.jsdelivr.net/gh/cdn-x/emoticons@3.1/qq/{name}.gif
    aru: https://gcore.jsdelivr.net/gh/cdn-x/emoticons@3.1/aru/{name}.gif
    tieba: https://gcore.jsdelivr.net/gh/cdn-x/emoticons@3.1/tieba/{name}.png
    blobcat: https://gcore.jsdelivr.net/gh/cdn-x/emoticons@3.1/blobcat/{name}.gif
  icon:
    # 留空时,图标和文字颜色相同
    default_color: accent # theme, accent, red, orange, yellow, green, cyan, blue, purple
  # {% button 标题 链接 %}
  button:
    default_color: theme # theme, accent, red, orange, yellow, green, cyan, blue, purple
  # {% image %}
  image:
    fancybox: false # true, false
  # {% copy xxx %}
  copy:
    toast: 复制成功
  # {% timeline %}
  timeline:
    max-height: 80vh
  # {% mark %}
  mark:
    default_color: yellow # light, dark, red, orange, yellow, green, cyan, blue, purple, warning, error
  # {% hashtag %}
  hashtag:
    default_color: # red, orange, yellow, green, cyan, blue, purple
  # {% okr o1 percent:50 status:in_track/at_risk/off_track/finished/unfinished %}
  okr:
    border: true # 是否显示边框
    status: # 可以自行增加
      # 进行中状态
      in_track:
        color: blue # red, orange, yellow, green, cyan, blue, purple
        label: 正常
      at_risk:
        color: yellow
        label: 风险
      off_track:
        color: orange
        label: 延期
      # 结果状态
      finished:
        color: green
        label: 已完成
      unfinished:
        color: red
        label: 未完成
  # {% gallery %}
  gallery:
    layout: grid # grid / flow
    size: mix # s / m / l / xl / mix
    ratio: square # origin / square
  chat:
    api: https://siteinfo.listentothewind.cn/api/v1


# 基础依赖
dependencies:
  jquery: https://gcore.jsdelivr.net/npm/jquery@3.7/dist/jquery.min.js
  marked: https://gcore.jsdelivr.net/npm/marked@13.0/lib/marked.umd.min.js
  lazyload:
    js: https://gcore.jsdelivr.net/npm/vanilla-lazyload@19.1/dist/lazyload.min.js
    transition: fade # blur, fade
    fix_ratio: true # true / false

# 内置服务,按需加载(页面内用到了就会加载,没有用到就不会加载)
data_services:
  # 外部 md 渲染
  mdrender:
    js: /js/services/mdrender.js
  # 数据填充类
  siteinfo:
    js: /js/services/siteinfo.js
    # 设置 api 可以自动提取网页标题、图标,服务部署方法:https://github.com/xaoxuu/site-info-api/
    # 接口测试通过后,把按钮的 href 部分替换成 {href} 之后填写到下方,例如:https://api.xaox.cc/site_info/v1?url={href}
    api:
  ghinfo:
    js: /js/services/ghinfo.js
  # 打分
  rating:
    js: /js/services/rating.js
    api: https://star-vote.xaox.cc/api/rating
  # 投票
  vote:
    js: /js/services/vote.js
    api: https://star-vote.xaox.cc/api/vote
  # 网格布局类
  sites:
    js: /js/services/sites.js
  friends:
    js: /js/services/friends.js
  friends_and_posts:
    js: /js/services/friends_and_posts.js
  # 列表布局类
  timeline:
    js: /js/services/timeline.js
  fcircle:
    js: /js/services/fcircle.js
  weibo:
    js: /js/services/weibo.js
  memos:
    js: /js/services/memos.js
  # chat
  voice:
    js: /js/plugins/voice.js
  video:
    js: /js/plugins/video.js
  download-file:
    js: /js/plugins/download-file.js
  # 最新评论获取类
  twikoo:
    js: /js/services/twikoo_latest_comment.js
  waline:
    js: /js/services/waline_latest_comment.js
  artalk:
    js: /js/services/artalk_latest_comment.js
  giscus:
    js: /js/services/giscus_latest_comment.js
  contributors:
    edit_this_page: # 从开头开始匹配替换
      '_posts/': # https://github.com/xaoxuu/xaoxuu.com/blob/main/source/_posts/
      'wiki/stellar/': https://github.com/xaoxuu/hexo-theme-stellar-docs/blob/main/
    js: /js/services/contributors.js


# 扩展插件接入方法:(插件名下面用 #plugin# 代替)
# 1. 在这里增加 #plugin# 配置,至少应含有 enable 字段,默认为空(不启用)
# 2. 新建文件 layout/_plugins/#plugin#.ejs 文件中设置编写加载代码。
# 2.1. 在该文件中可以直接使用 conf 来读取用户在【步骤 1】填写的配置字段内容
# 2.2. 如果需要引入 css 或 js,可以使用 utils.css(xxx)、utils.js(xxx),具体可参考 layout/_plugins/fancybox.ejs
# 2.3. 如果需要本地 js 文件,请放入 /source/js/plugins 文件夹中,引入方式为:utils.js('/js/plugins/xxx.js');
# 3. 如果这个插件只需要引入外部文件,可以在【步骤 1】处增加 inject 字段,而无需进入【步骤 2】创建 ejs,参考 katex
plugins:

  # preload
  preload:
    enable: true
    service: flying_pages # flying_pages
    flying_pages: https://gcore.jsdelivr.net/npm/flying-pages@2/flying-pages.min.js

  # https://fancyapps.com/docs/ui/fancybox/
  # available for {% image xxx %}
  fancybox:
    enable: true
    loader: /js/plugins/fancybox-loader.js
    js: https://gcore.jsdelivr.net/npm/@fancyapps/ui@5.0/dist/fancybox/fancybox.umd.js
    css: https://gcore.jsdelivr.net/npm/@fancyapps/ui@5.0/dist/fancybox/fancybox.css
    # 让 md 语法图片支持放大可以这样写: .md-text img:not([class]), .md-text .image img
    # 可以处理评论区的图片(不支持 iframe 类评论系统)例如:
    # 使用 twikoo 评论可以写: .tk-content img:not([class*="emo"])
    # 使用 waline 评论可以写: #waline_container .vcontent img
    selector: .timenode p>img # 多个选择器用英文逗号隔开

  # swiper
  swiper:
    enable: true
    css: https://unpkg.com/swiper@10.3/swiper-bundle.min.css
    js: https://unpkg.com/swiper@10.3/swiper-bundle.min.js

  # https://scrollrevealjs.org/api/reveal.html
  scrollreveal:
    enable: #true # 慎用,有些时候打开页面空白
    js: https://gcore.jsdelivr.net/npm/scrollreveal@4.0/dist/scrollreveal.min.js
    distance: 8px
    duration: 500 # ms
    interval: 50 # ms
    scale: 1 # 0.1~1

  # AI 摘要
  # https://github.com/qxchuckle/Post-Summary-AI
  tianli_gpt:
    enable: #true
    js: https://jsd.onmicrosoft.cn/gh/qxchuckle/Post-Summary-AI@6.0/chuckle-post-ai.min.js
    field: post # all, post, wiki
    key: 5Q5mpqRK5DkwT1X9Gi5e # tianli_gpt key
    total_length: 1000 # 设置提交的字数限制,默认为1000字,上限为5000,超过5000字符将被截断
    typewriter: true # 打字机动画
    summary_directly: true # 是否直接显示摘要,否则显示 AI 简介
    rec_method: all # all, web # 文章推荐方式,all:匹配数据库内所有文章进行推荐,web:仅当前站内的文章,默认all
    hide_shuttle: true # 是否隐藏矩阵穿梭
    summary_toggle: false
    interface:
      name: AI摘要
      introduce: '我是文章辅助AI: QX-AI,点击下方的按钮,让我生成本文简介、推荐相关文章等。'
      version: TianliGPT
      button: ["介绍自己", "推荐文章", "生成摘要", "矩阵穿梭"]


  # Katex - The fastest math typesetting library for the web
  # https://katex.org/docs/autorender.html
  # https://github.com/KaTeX/KaTeX
  # 使用 hexo-renderer-markdown-it-plus 作为公式渲染器:npm uninstall hexo-renderer-marked --save npm install hexo-renderer-markdown-it-plus --save
  katex:
    enable: #true # hexo-renderer-markdown-it-plus 默认开启 katex,此选项仅用于引入样式
    inject: |
      <link rel="stylesheet" href="https://gcore.jsdelivr.net/npm/katex@0.16/dist/katex.min.css" integrity="sha384-vKruj+a13U8yHIkAyGgK1J3ArTLzrFGBbBc0tDp4ad/EyewESeXE/Iv67Aj8gKZ0" crossorigin="anonymous">

  # MathJax
  # 需在Markdown文件开头加入mathjax: true
  # 推荐使用Pandoc: npm uninstall hexo-renderer-marked --save & npm install hexo-renderer-pandoc --save
  mathjax:
    v3: false # 若使用 v3,需將 js 設置為 https://cdnjs.cloudflare.com/ajax/libs/mathjax/3.2.2/es5/tex-mml-chtml.min.js
    enable: # true # 可以在特定文章的 front-matter 中设置 mathjax: true 来开启,也可以在这里设置全局开启
    js: https://cdnjs.cloudflare.com/ajax/libs/mathjax/2.7.6/MathJax.js?config=TeX-AMS-MML_HTMLorMML

  # Mermaid - markdwon to flow chart, seq chart, class chart ...
  # 需要安装 npm install --save hexo-filter-mermaid-diagrams
  # 使用时 需要在Markdown文件开头加入 mermaid: true
  # 使用示例:
  # ```mermaid
  # graph LR
  #   A(Section A) -->|option 1| B(Section A)
  #   B -->|option 2| C(Section C)
  # ```
  mermaid:
    enable: # true # 可以在特定文章的 front-matter 中设置 mermaid: true 来开启,也可以在这里设置全局开启
    style_optimization: false # use custom style in stellar
    # js: https://unpkg.com/mermaid@9.0.0/dist/mermaid.min.js
    js: https://gcore.jsdelivr.net/npm/mermaid@v9/dist/mermaid.min.js
    # Available themes: default | dark | forest | neutral
    theme: neutral

  # 代码块复制按钮
  copycode:
    enable: true
    default_text: 'Copy'
    success_text: 'Copied'
    toast: 复制成功

  # 赫蹏 (Heti) - 专为中文网页内容设计的排版样式增强
  # https://github.com/sivan/heti
  heti:
    enable: false # 此插件会和代码块冲突,仅适用于纯中文博主。
    css: https://unpkg.com/heti@0.9/umd/heti.min.css
    js: https://unpkg.com/heti@0.9/umd/heti-addon.min.js


style:
  prefers_theme: auto # auto / light / dark
  smooth_scroll: true # true / false 开启时如果目录过长可能无法准确定位
  font-size:
    root: 16px # 改这个会影响全局所有文字的字号
    body: 17px # 影响正文区域的字号,如果改成 px 则不受 root 影响
    code: 85% # 相较于其所在行的文本大小,建议用百分比
    codeblock: 0.8125rem # 13px
  font-family:
    body: 'system-ui, "Microsoft Yahei", "Segoe UI", Arial, sans-serif'
    code: 'Menlo, Monaco, Consolas, system-ui, monospace, sans-serif'
    codeblock: 'Menlo, Monaco, Consolas, system-ui, monospace, sans-serif'
  text-align: left
  prefix:
    h2: https://api.iconify.design/ci:heading-h2.svg
  border-radius:
    card-l: 24px # 侧边栏、文章横幅位置的圆角
    card: 16px # 文章内大部分卡片的圆角
    card-s: 12px # 文章内小型卡片的圆角
    bar: 8px # 横条类元素的圆角
    image-l: 24px # 非技术类文章插图圆角
    image: 16px # 技术类文章插图圆角
    image-s: 8px # 评论区图片圆角(部分评论支持)
  color:
    # 主题色配置(不会根据明暗动态调整,请设置为通用的颜色)
    theme: 'hsl(192 98% 55%)' # 主题色
    accent: 'hsl(14 100% 57%)' # 强调色
    link: 'hsl(207 90% 54%)' # 超链接颜色
  animated_avatar:
    animate: auto # auto, always
    background: https://gcore.jsdelivr.net/gh/cdn-x/placeholder@1.0.12/avatar/round/rainbow64@3x.webp
  codeblock:
    scrollbar: 4px
    highlightjs_theme: https://gcore.jsdelivr.net/gh/highlightjs/cdn-release@11.9/build/styles/atom-one-dark.min.css
  loading:
    loading: 正在加载
    error: 加载失败,请稍后重试。
  gradient: # https://webgradients.com/
    start: 'linear-gradient(to right, hsl(215, 95%, 64%), hsl(195, 95%, 60%), hsl(165, 95%, 56%), hsl(165, 95%, 56%), hsl(195 95% 60%), hsl(215, 95%, 64%))'
  leftbar:
    # 可以设置:纯色/渐变色/图片作为背景
    background-color: var(--card) # var(--block)
    background-image: url(https://gcore.jsdelivr.net/gh/cdn-x/placeholder@1.0.13/image/sidebar-bg1@small.jpg)
    blur-px: 100px
    blur-bg: var(--bg-a60)
    background-opacity: 0.8
  paginator:
    prev: https://gcore.jsdelivr.net/gh/cdn-x/placeholder@1.0.12/arrow/f049bbd4e88ec.svg
    next: https://gcore.jsdelivr.net/gh/cdn-x/placeholder@1.0.12/arrow/064b95430caf4.svg
  error_page: https://gcore.jsdelivr.net/gh/cdn-x/placeholder@1.0.12/404/1c830bfcd517d.svg
  site: # 使用 background-image 后,blur 设置才有效
    # background-image: url(https://gcore.jsdelivr.net/gh/cdn-x/placeholder@1.0.14/image/site-bg1@small.webp)
    blur-px: 100px
    blur-bg: var(--bg-a75)
    blur-sat: 300%
  # 技术文章内页各级标题前面的符号
  header_prefix:
    h2: '#'
    h3: '='
    h4: '|'
    h5: ':'


default:
  avatar: https://gcore.jsdelivr.net/gh/cdn-x/placeholder@1.0.12/avatar/round/3442075.svg
  link: https://gcore.jsdelivr.net/gh/cdn-x/placeholder@1.0.12/link/8f277b4ee0ecd.svg
  cover: https://gcore.jsdelivr.net/gh/cdn-x/placeholder@1.0.12/cover/76b86c0226ffd.svg
  image: https://gcore.jsdelivr.net/gh/cdn-x/placeholder@1.0.12/image/2659360.svg
  project: https://gcore.jsdelivr.net/gh/cdn-x/placeholder@1.0.12/image/2779789.png
  banner: https://gcore.jsdelivr.net/gh/cdn-x/placeholder@1.0.12/banner/books.jpg
  topic: https://gcore.jsdelivr.net/gh/cdn-x/placeholder@1.0.12/image/10433048.png
  loading: https://api.iconify.design/eos-icons:three-dots-loading.svg?color=%231cd0fd
  # loading: https://github.githubassets.com/images/mona-loading-dark.gif
  image_onerror: "data:image/svg+xml,%3Csvg xmlns='http://www.w3.org/2000/svg' width='2rem' height='2rem' viewBox='0 0 24 24'%3E%3C!-- Icon from Solar by 480 Design - https://creativecommons.org/licenses/by/4.0/ --%3E%3Cpath fill='%23F44336' d='M22 12.698c-.002 1.47-.013 2.718-.096 3.743c-.097 1.19-.296 2.184-.74 3.009a4.2 4.2 0 0 1-.73.983c-.833.833-1.893 1.21-3.237 1.39C15.884 22 14.2 22 12.053 22h-.106c-2.148 0-3.83 0-5.144-.177c-1.343-.18-2.404-.557-3.236-1.39c-.738-.738-1.12-1.656-1.322-2.795c-.2-1.12-.236-2.512-.243-4.241Q1.999 12.737 2 12v-.054c0-2.148 0-3.83.177-5.144c.18-1.343.557-2.404 1.39-3.236s1.893-1.21 3.236-1.39c1.168-.157 2.67-.175 4.499-.177a.697.697 0 1 1 0 1.396c-1.855.002-3.234.018-4.313.163c-1.189.16-1.906.464-2.436.994S3.72 5.8 3.56 6.99C3.397 8.2 3.395 9.788 3.395 12v.784l.932-.814a2.14 2.14 0 0 1 2.922.097l3.99 3.99a1.86 1.86 0 0 0 2.385.207l.278-.195a2.79 2.79 0 0 1 3.471.209l2.633 2.37c.265-.557.423-1.288.507-2.32c.079-.972.09-2.152.091-3.63a.698.698 0 0 1 1.396 0' opacity='.5'/%3E%3Cpath fill='%23F44336' fill-rule='evenodd' d='M17.5 11c-2.121 0-3.182 0-3.841-.659S13 8.621 13 6.5s0-3.182.659-3.841S15.379 2 17.5 2s3.182 0 3.841.659S22 4.379 22 6.5s0 3.182-.659 3.841S19.621 11 17.5 11m-1.47-7.03a.75.75 0 1 0-1.06 1.06l1.47 1.47l-1.47 1.47a.75.75 0 0 0 1.06 1.06l1.47-1.47l1.47 1.47a.75.75 0 1 0 1.06-1.06L18.56 6.5l1.47-1.47a.75.75 0 0 0-1.06-1.06L17.5 5.44z' clip-rule='evenodd'/%3E%3C/svg%3E"

api_host:
  ghapi: api.github.com
  ghraw: raw.githubusercontent.com
  gist: gist.github.com
  # https://github.com/anuraghazra/github-readme-stats
  ghcard: github-readme-stats.vercel.app


# 非资深hexo开发者尽量不要动这块
system:
  # hexo 支持输出的链接格式众多,维护成本高,为了减少出错,统一成推荐的格式。
  override_pretty_urls: true
部署服务器程序
04. 安装Artalk评论系统和Lsky兰空图床
4.1 租赁服务器
这里我推荐VPS租赁商 | 八壹云计算
只做推荐,可以自行选择服务商,建议预算足够优先阿里云或者腾讯云一类的大厂
我们这里介绍无ICP备案计划的建站步骤
我们需要配置至少为2C2G的服务器,以供我们搭建所需的项目
③* 本文默认服务器部署环境为Ubuntu22.04 LTS
4.2 安装FinalShell
FinalShell 是一个开源的SSH终端工具,可以轻松管理远程服务器
- 下载:下载FinalShell
- 安装:无脑下一步即可
4.3 链接远程服务器
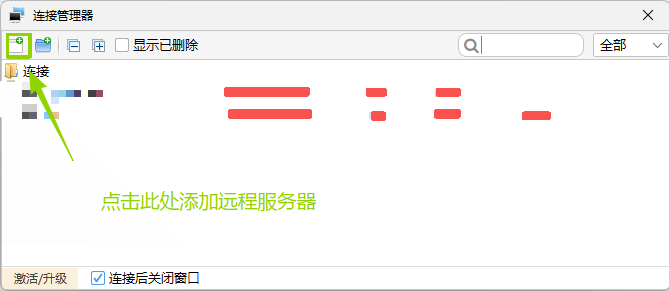 1
1
链接类型选择SSH连接(Linux)
填写服务器的IP地址和端口,用户名和密码,然后点击链接即可
注意:一些云服务厂商的默认SSH端口可能为随机端口,未声明则为22默认端口
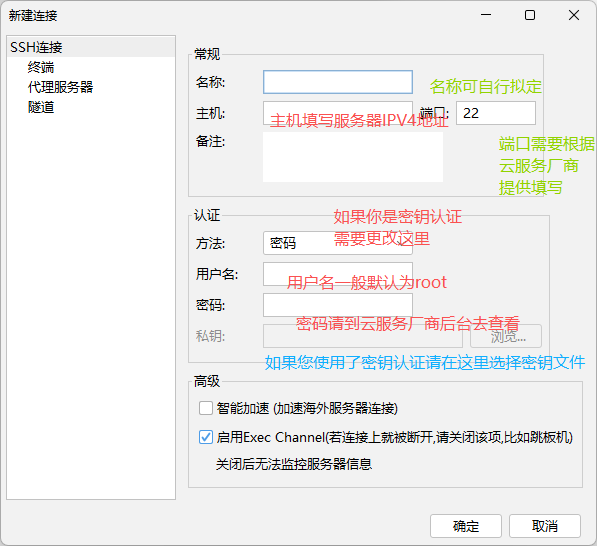
4.4 安装1Panel
博主喜欢所有程序都放在Docker容器中执行,以保护主机,个人习惯,所以本文使用1Panel
- 安装:安装1Panel
bash -c "$(curl -sSL https://resource.fit2cloud.com/1panel/package/v2/quick_start.sh)"- 配置:在安装过程中需要手动设置
安全入口,用户名,密码(在您输入密码时候不会显示)
4.5 配置Docker
登录进入1Panel管理面板,依次选择[左侧]容器 -> [上方]配置 -> 全部配置
将下方配置复制进代码框内,点击保存即可
{
  "registry-mirrors": [
    "https://hub.rat.dev",
    "https://docker.1panel.live"
  ],
  "log-driver": "json-file",
  "log-opts": {
    "max-size": "10m",
    "max-file": "3"
  }
}
4.6 安装mariadb数据库
MariaDB 是由 MySQL 原始创始人发起的分支,旨在完全替代 MySQL,并保持高度兼容。 它的核心差异在于更开放、激进的迭代策略,提供了比 MySQL 更多的存储引擎(如列式存储ColumnStore、MyRocks)和新特性(如原生向量支持、多源复制)。目前主流 Linux 发行版(如 RHEL、Ubuntu)已默认用 MariaDB 替换了 MySQL。
关于资源占用与性能,两者各有侧重: 默认情况下,MariaDB 因启用 Aria 引擎和线程池,内存占用略高于 MySQL。 但得益于其线程池技术,它在处理高并发连接时性能下降曲线更平缓,且官方宣称在低并发负载下比 MySQL 快 13%-36%。如果你需要从 MySQL 迁移,通常直接卸载安装即可,但要注意 JSON 字段的存储逻辑和 GTID 复制协议存在不兼容。
以上内容由AI生成,请注意判断
-
安装MariaDB:
登录1Panel管理面板,依次选择[左侧]应用商店 -> [上方]数据库 -> 选择MariaDB -> 点击安装 -
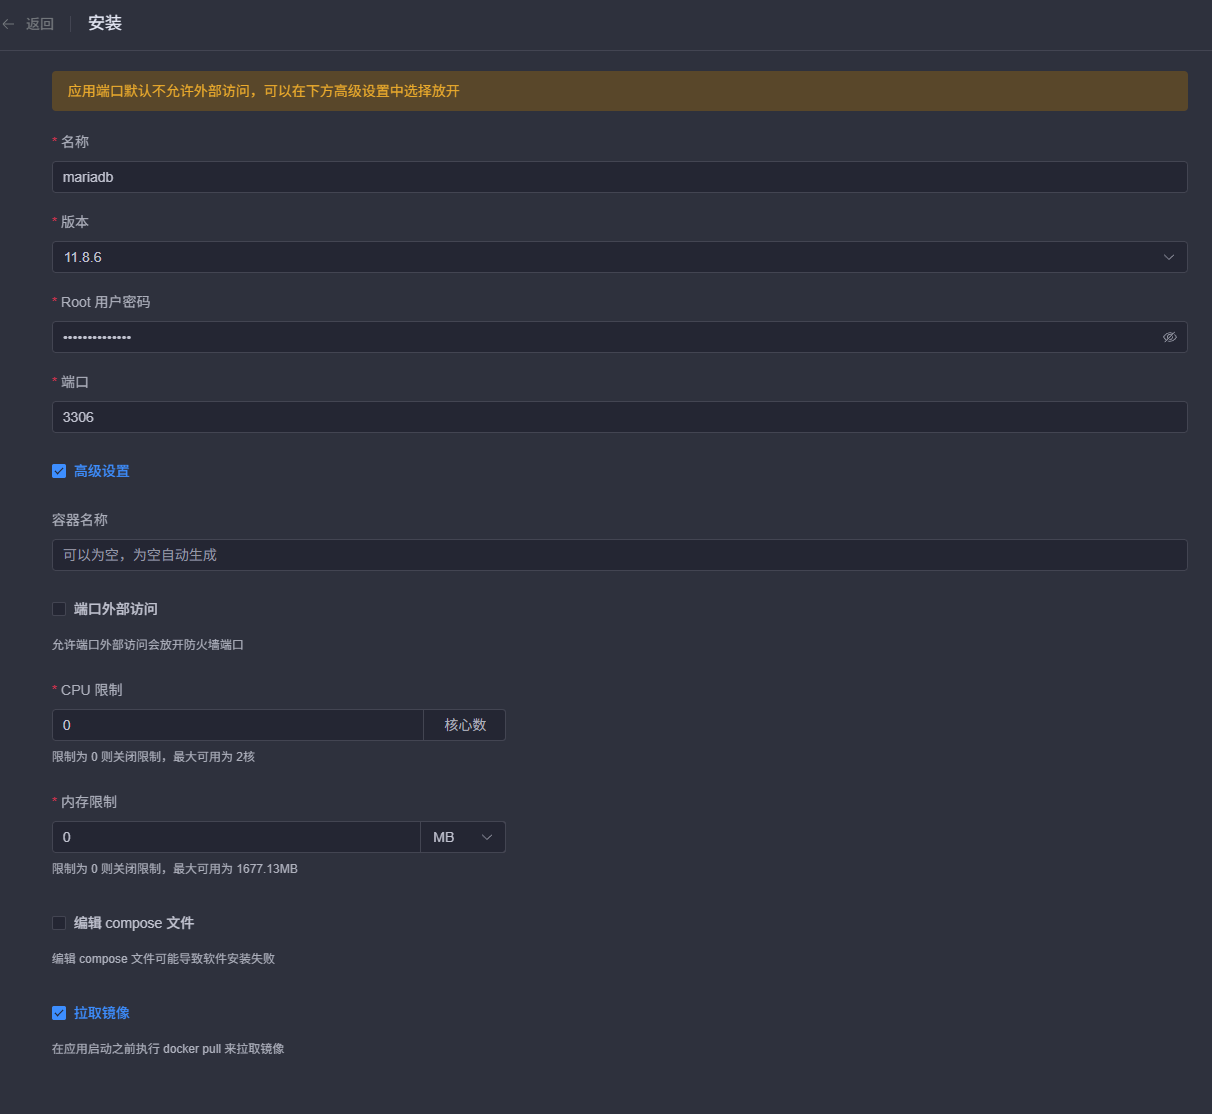
在安装配置页面:
名称等配置保持不变,切记关闭端口外部访问,否则可能会有被攻击风险,访问端口默认3306即可
4.7 安装NPM(NginxProxyManager)
Nginx Proxy Manager(简称 NPM)是一个开源的、带 Web 可视化管理界面的反向代理工具,本质上是给 Nginx 套上了一层“图形化外壳”。 它的核心价值在于彻底告别手动编辑复杂的 Nginx 配置文件,你只需要在浏览器里填写域名、目标 IP 和端口,它就会自动生成配置。最大的亮点是内置了 Let’s Encrypt 免费 SSL 证书的申请与自动续期功能,点几下鼠标就能给网站配上 HTTPS,特别适合不熟悉 Nginx 命令行的开发者、运维小白或需要快速部署多个 Docker 服务的小团队。
相比直接操作 Nginx 配置文件,NPM 的优势在于“简单直观”,但代价是“灵活性有所降低”:一些特别复杂的 Nginx 高级规则可能需要额外通过“Advanced”选项卡手动补充。资源占用方面,因为 NPM 包含 Web 界面、数据库并基于 Docker 运行,默认内存占用会略高于纯命令行 Nginx。如果部署后觉得资源消耗偏高,可以通过限制 Worker 进程数量、调整连接数和配置代理缓存等方式进行优化。
以上内容由AI生成,请注意判断
-
安装NPM:
登录1Panel管理面板,依次选择[左侧]应用商店 -> [上方]Web服务器 -> 选择Nginx Proxy Manager -> 点击安装 -
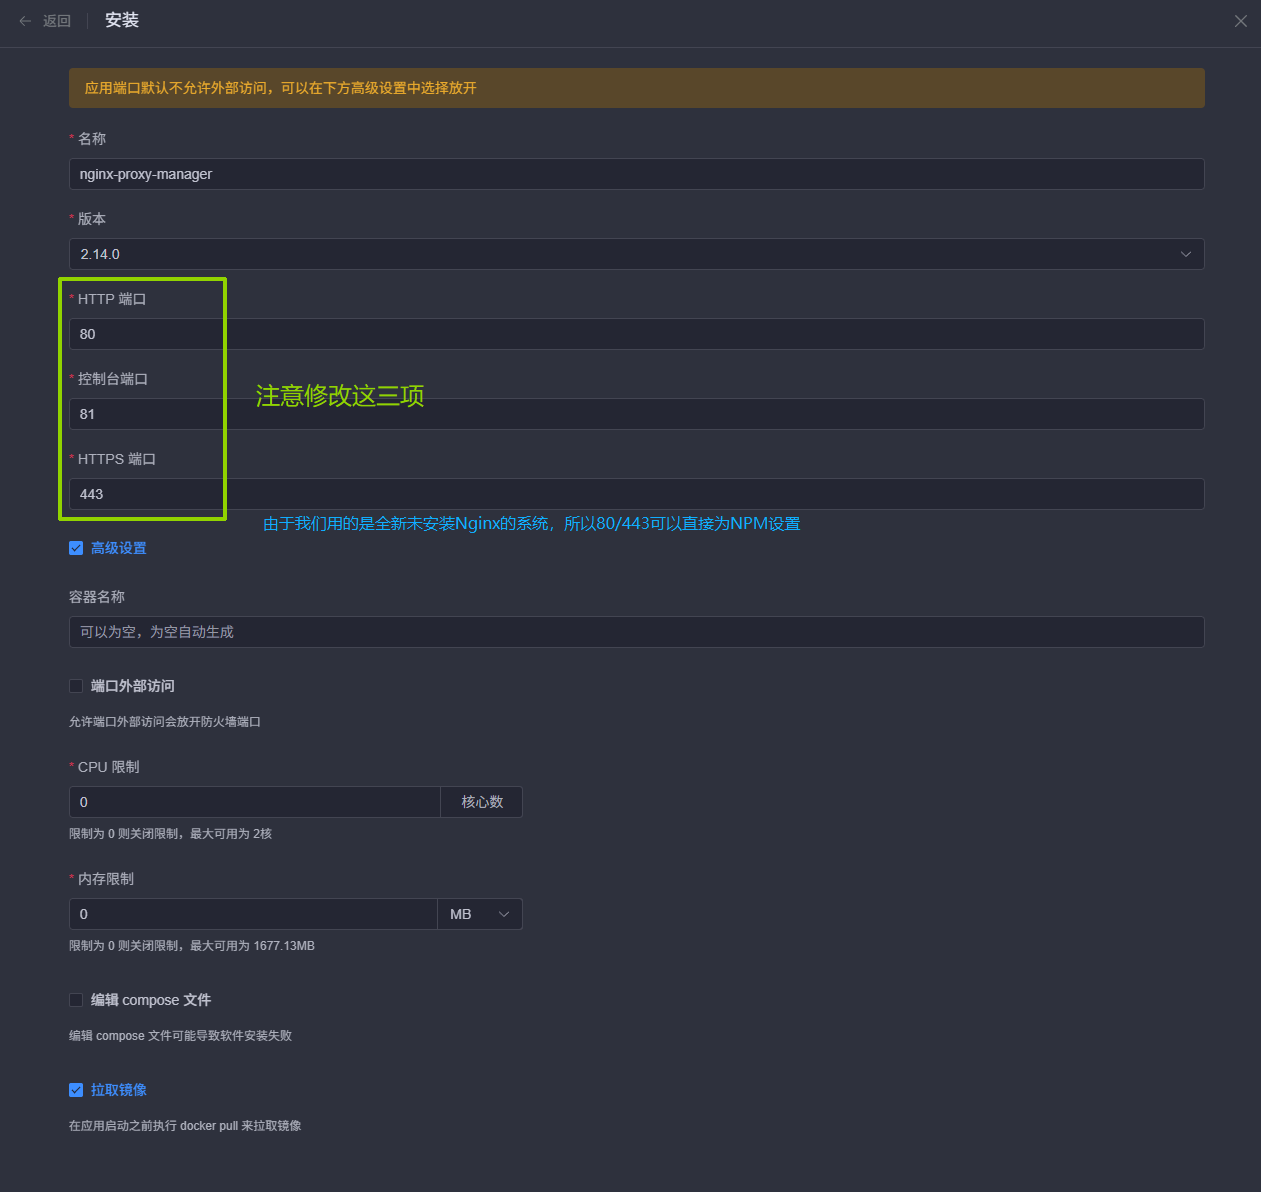
在安装配置页面:
名称等配置保持不变,注意:需要修改HTTP端口,控制台端口,HTTPS端口分别为80,81,443,需要开启端口外部访问
-
安装完成后:
浏览器输入 http://服务器IP:81 进入NPM后台,默认用户名密码 admin@example.com / changeme
进入后会要求你修改用户邮箱与密码,按提示修改即可
4.8 安装Lsky图床
-
安装Lsky:
登录1Panel管理面板,依次选择[左侧]应用商店 -> [上方]云存储 -> 选择Lsky-pro -> 点击安装 -
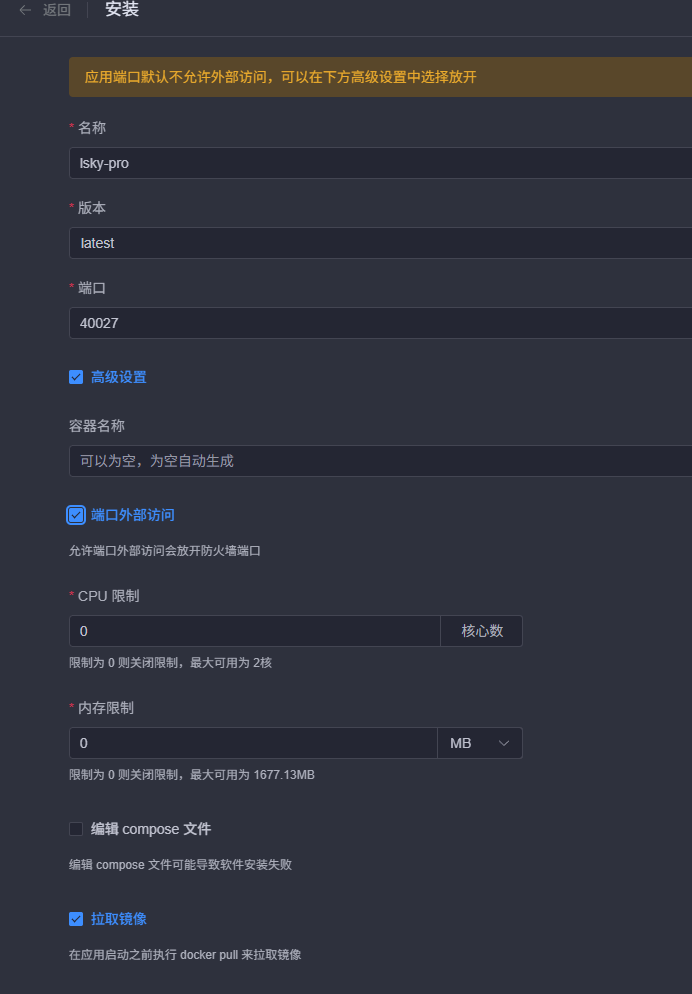
在安装配置页面:
名称等配置保持不变,需要开启端口外部访问
-
安装完成后:
浏览器输入 http://服务器IP:40027 进入Lsky-pro后台
具体配置细节请查看视频教程
4.9 安装Artalk评论系统
-
安装Artalk:
登录1Panel管理面板,依次选择[左侧]应用商店 -> [上方]实用工具 -> 选择Artalk -> 点击安装 -
在安装界面:
需要修改博客名称和博客地址,需要开启端口外部访问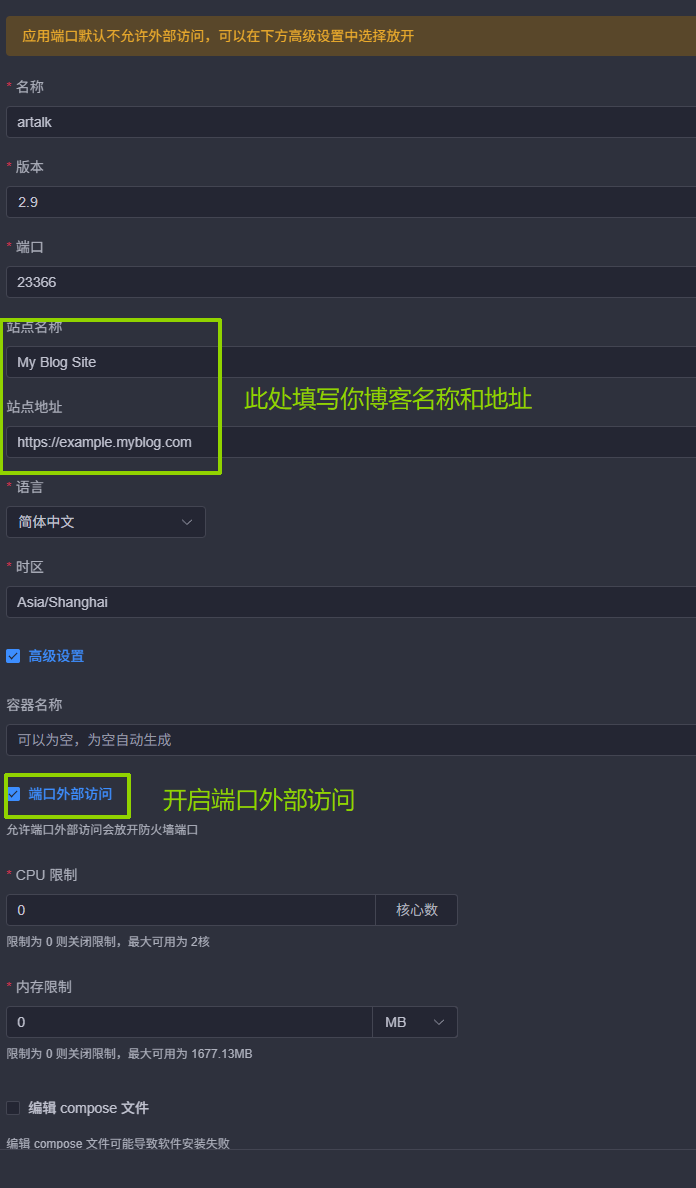
-
安装完成后:
浏览器输入 http://服务器IP:23366 进入Artalk后台
具体配置细节请查看视频教程
此处配置极为复杂,强烈建议查看视频教程
05. 博客配置Artalk和lsky图床
- 使用VSCode打开
_config.stellar.yml文件 - 找到
comments字段,找到artalk字段(约在314行左右),修改如下内容
  artalk:
    css: https://unpkg.com/artalk@2.9/dist/Artalk.css
    js: https://unpkg.com/artalk@2.9/dist/Artalk.js
    server:  # 后端服务地址
    site: '' # 站点名称(此处为刚才创建应用时候的站点名称)
    darkMode: auto # 其它模式都有问题,慎用,否则后果自负
    fancybox: true # 是否为评论区启用 fancybox
    # artalk 有三类图片:1.上传至服务端 2.上传至服务端后利用upgit上传至图床 3.前端上传至图床(本配置为此类)
    # 配置此项时将覆盖服务端上传能力
    imageUploader:
      # 以兰空图床为例,下列填写内容为:
      api: 'https://xxxxxx/api/v1/upload' # 图床上传地址
      token: 'Bearer xxxxxxxxxxxxxx' # 图床验证
      resp: 'data.links.url' # 图片地址返回值的字段
06. 购买属于自己的独立域名
6.1 选择服务商
6.2 购买CDN服务(可选)
Q:CDN是什么?
A:CDN就像是为网站内容建立的“全国连锁快递仓库”。它的核心工作,就是把数据提前运送到离用户最近的地方,让用户能以最快速度获取想要的信息
这个项目是可选择项目,配置CDN的目的是为了加速静态网站在全球的访问速度
因为配置过CDN之后,用户访问的不再是你的源站服务器,而是CDN为用户选择的最近的边缘节点
这样还可以减缓你的源站服务器流量压力
CDN只需在你的源站更新后重新拉取一次缓存,后续用户访问你的网站都是走的CDN边缘节点缓存,并不是访问你的源站服务器
配置CDN后还可防止源站IP泄露问题,降低源站被DDOS的风险
具体源站IP泄露问题请查看我往期文章 | 博客源站IP泄露的两种主要方式与防护指南
博主自己使用的是腾讯云的EdgeOne边缘加速服务
EO提供了免费套餐,对于我们这样的小型静态博客,EdgeOne的免费套餐完全够用了
6.3 配置EO(可选)
选择计费管理 -> 套餐管理 -> 购买套餐
如果您没有免费版,可选择购买个人版
购买完成后,回到服务总览页面,点击新增站点
输入您购买的域名,并根据提示进行所有权验证
验证完成后,点击域名即可进入配置界面
可以依次点击 域名服务 -> 域名管理 -> 添加域名
进行多级域名的代理配置
在配置多级域名代理时,回源配置中的源站配置直接填写您的源站服务器IP,不需要填写端口等信息,回源设置80或者443均可(具体需根据您源站NPM的设置进行抉择)
回源 HOST 头请选择使用加速域名
模板可以选择网站加速
6.4 配置域名解析
6.4.1 未配置CDN的方法
这里以阿里云购买的域名为例
-
登录阿里云控制台,依次选择
域名与网站->云解析DNS-> 选择域名 -> 点击查看 -> 点击添加记录 -
添加记录
如果您没有配置CDN服务,则添加的记录类型为A记录,记录值为服务器IP -
添加完成后,请等待DNS生效,可能需要等待1~30分钟
6.4.2 配置CDN的方法
这里以阿里云购买的域名为例
-
登录阿里云控制台,依次选择
域名与网站->云解析DNS-> 选择域名 -> 点击查看 -> 点击添加记录 -
添加记录 如果配置了CDN服务,则添加的记录类型为
CNAME记录,记录值为EO提供给您的CNAME记录值 -
添加完成后,请等待DNS生效,可能需要等待1~30分钟
6.5 配置NginxProxyManager
使用 http://您的服务器IP:81 进入NginxProxyManager管理后台
选择Hosts —> Proxy Hosts —> Add Proxy Host
在Domain Names中填写您的多级域名 例如blog.example.com
选择Advanced并填写如下内容
location / {
    # 指向你存放 Hexo 静态文件的绝对路径
    root /home/blog/dist;
    try_files $uri $uri/ /index.html;

    # 禁止 Nginx 本地缓存,完全由 CDN 控制
    expires off;
    add_header Cache-Control "no-cache, no-store, must-revalidate";
    add_header Pragma "no-cache";
}

# 关闭 NPM 默认的 log 格式(可选,减少日志噪音)
access_log off;
点击Save即可
这样配置好NPM后,EO就可以正常访问到源站内容了
07. 配置GithubAction自动部署
这里用到了GithubAction的双仓库部署模式
1号仓库用来存放博客开发下的源文件
因为可能会有Token的问题,所以要设置为私密仓库
通过1号仓库Action自动构建静态文件推送到仓库2
2号仓库用来存放博客生成的静态文件,并继续通过GithubAction部署到服务器上
7.1 注册Github账号
7.2 创建仓库1(私密)
7.2.1 创建仓库1并推送
创建一个仓库,例如HexoBlog
这个仓库负责存放博客源文件
创建完成后,将仓库设置为私密
在本地开发文件夹内右键选择Git,并依次输入
git init
git add .
git commit -m "init"
git remote add origin (这里要设置为Github给你的仓库地址)
git branch -M master
git push -u origin master
这样整个博客的源文件都会上传到1号仓库中
7.2.2 配置仓库1Action
- 在本地创建
.github/workflows/deploy.yml文件,并添加如下内容:
name: Deploy to GitHub Pages

on:
  push:
    branches:
      - master # ❗[需要修改] 改成你的默认分支名称(main / master / develop)

jobs:
  deploy:
    runs-on: ubuntu-latest
    steps:
      - name: Checkout source
        uses: actions/checkout@v3

      - name: Setup Node.js
        uses: actions/setup-node@v3
        with:
          node-version: '22.14.0' # 🔧 [可选修改] 改成你项目需要的 Node.js 版本

      - name: Cache dependencies
        uses: actions/cache@v3
        with:
          path: ~/.npm
          key: ${{ runner.os }}-node-${{ hashFiles('**/package-lock.json') }}

      - name: Install dependencies
        run: npm install

      - name: Generate static files
        run: npx hexo generate

      # ===== 复制部署脚本到 public 目录 =====
      - name: Copy deploy workflow to public
        run: |
          echo "📋 复制部署脚本到 public 目录..."

          # 检查源文件是否存在
          if [ -f "./HexoSite/.github/workflows/deploy-to-server.yml" ]; then
            # 创建目标目录
            mkdir -p ./public/.github/workflows

            # 复制文件
            cp ./HexoSite/.github/workflows/deploy-to-server.yml ./public/.github/workflows/

            echo "✅ 部署脚本已复制:"
            ls -la ./public/.github/workflows/
          else
            echo "⚠️ 警告:未找到部署脚本文件"
            echo "   期望路径: ./HexoSite/.github/workflows/deploy-to-server.yml"
            exit 1  # 如果文件不存在,让工作流失败
          fi
      # ====================================

      - name: Deploy to HexoSite
        uses: peaceiris/actions-gh-pages@v3
        with:
          personal_token: ${{ secrets.PERSONAL_TOKEN }}
          publish_dir: ./public
          publish_branch: master
          external_repository: username/HexoSite # ❗ [需要修改] 改成目标仓库(格式:用户名/仓库名)
          user_name: 'github-actions[bot]'
          user_email: 'github-actions[bot]@users.noreply.github.com'
          exclude_assets: ''  # 覆盖默认值,不排除任何文件
继续在本地开发文件夹中的CMD窗口执行
@echo off & set "START_DIR=%CD%" & mkdir ".\HexoSite\.github\workflows" 2>nul & cd /d ".\HexoSite\.github\workflows" & powershell -Command "Invoke-WebRequest -Uri 'https://gcore.jsdelivr.net/gh/mete0rxsc/HexoSite@master/.github/workflows/deploy-to-server.yml' -OutFile 'deploy-to-server.yml'" & cd /d "%START_DIR%"在HexoBlog(一号仓库)设置密钥
选择Settings —> Secrets and variables —> Actions
在Repository secrets添加密钥PERSONAL_TOKEN,值为Github个人令牌
如果您还没有Personal Access Token,请在Github | Personal access tokens (classic)中创建
7.3 创建仓库2(公开)
创建一个仓库,例如HexoSite
这个仓库负责存放博客生成的静态文件
创建完成后,将仓库设置为公开
这个仓库的文件是通过仓库1的Action自动生成的,不需要手动添加,但是请注意:在一号仓库的Action中,请将 external_repository: username/HexoSite 改成你自己的仓库名称
7.3.1 配置仓库2Action
我们刚才执行的CMD文件就是为仓库2的Action下载的,他会通过仓库1自动复制到仓库2中
但是我们需要更改.\HexoSite\.github\workflows\deploy-to-server.yml这个文件内的内容(以下展示是密钥登录,密码登录请向下翻)
name: Deploy to Aliyun Server and Purge EO Cache

on:
  push:
    branches:
      - master # ❗[需要修改] 改成你的默认分支名称(main / master / develop)

jobs:
  deploy:
    runs-on: ubuntu-latest

    steps:
      # 1. 拉取代码
      - name: Checkout repository
        uses: actions/checkout@v3

      # 2. 添加服务器到 known_hosts
      - name: Add server to known_hosts
        run: |
          mkdir -p ~/.ssh
          ssh-keyscan -H ${{ secrets.SERVER_IP }} >> ~/.ssh/known_hosts

      # 3. 准备本地文件
      - name: Prepare files locally
        run: |
          mkdir -p ./deploy_dist
          rsync -av --exclude='.git' --exclude='.github' --exclude='deploy_dist' ./ ./deploy_dist/
          echo "✅ 文件已准备到 ./deploy_dist 目录:"
          ls -la ./deploy_dist/

      # 4. 清理远程目录
      - name: Clean remote directory
        uses: appleboy/ssh-action@v0.1.5
        with:
          host: ${{ secrets.SERVER_IP }}
          username: ${{ secrets.SERVER_USER }}
          key: ${{ secrets.SERVER_SSH_KEY }}
          script: |
            mkdir -p /home/blog
            rm -rf /home/blog/dist
            mkdir -p /home/blog/dist
            echo "✅ /home/blog/dist 已清空重建"

      # 5. 部署到服务器
      - name: Deploy to server
        uses: appleboy/scp-action@v0.1.4
        with:
          host: ${{ secrets.SERVER_IP }}
          username: ${{ secrets.SERVER_USER }}
          key: ${{ secrets.SERVER_SSH_KEY }}
          source: "./deploy_dist/*"
          target: "/home/blog/dist"
          strip_components: 1
          rm: false

      # 6. 刷新腾讯云 EdgeOne 缓存(使用官方 CLI)
      - name: Install Tencent Cloud CLI
        run: pip install tccli

      - name: Configure and Purge EdgeOne Cache
        env:
          TENCENTCLOUD_SECRET_ID: ${{ secrets.EO_SECRET_ID }}
          TENCENTCLOUD_SECRET_KEY: ${{ secrets.EO_SECRET_KEY }}
        run: |
          tccli configure set secretId $TENCENTCLOUD_SECRET_ID
          tccli configure set secretKey $TENCENTCLOUD_SECRET_KEY
          tccli configure set region ap-guangzhou
          tccli teo CreatePurgeTask \
            --ZoneId ${{ secrets.EO_ZONE_ID }} \
            --Type purge_prefix \
            --Method invalidate \
            --Targets '["${{ secrets.EO_DOMAIN }}"]'
密码版本:
name: Deploy to Aliyun Server and Purge EO Cache

on:
  push:
    branches:
      - master  # ❗[需要修改] 改成你的默认分支名称(main / master / develop)

jobs:
  deploy:
    runs-on: ubuntu-latest

    steps:
      # 1. 拉取代码
      - name: Checkout repository
        uses: actions/checkout@v3

      # 2. 添加服务器到 known_hosts
      - name: Add server to known_hosts
        run: |
          mkdir -p ~/.ssh
          ssh-keyscan -H ${{ secrets.SERVER_IP }} >> ~/.ssh/known_hosts

      # 3. 准备本地文件
      - name: Prepare files locally
        run: |
          mkdir -p ./deploy_dist
          rsync -av --exclude='.git' --exclude='.github' --exclude='deploy_dist' ./ ./deploy_dist/
          echo "✅ 文件已准备到 ./deploy_dist 目录:"
          ls -la ./deploy_dist/

      # 4. 清理远程目录(密码登录版)
      - name: Clean remote directory
        uses: appleboy/ssh-action@v0.1.5
        with:
          host: ${{ secrets.SERVER_IP }}
          username: ${{ secrets.SERVER_USER }}
          password: ${{ secrets.SERVER_PASSWORD }}  # 🔧 密码登录
          script: |
            mkdir -p /home/blog
            rm -rf /home/blog/dist
            mkdir -p /home/blog/dist
            echo "✅ /home/blog/dist 已清空重建"

      # 5. 部署到服务器(密码登录版)
      - name: Deploy to server
        uses: appleboy/scp-action@v0.1.4
        with:
          host: ${{ secrets.SERVER_IP }}
          username: ${{ secrets.SERVER_USER }}
          password: ${{ secrets.SERVER_PASSWORD }}  # 🔧 密码登录
          source: "./deploy_dist/*"
          target: "/home/blog/dist"
          strip_components: 1
          rm: false

      # 6. 刷新腾讯云 EdgeOne 缓存(使用官方 CLI)
      - name: Install Tencent Cloud CLI
        run: pip install tccli

      - name: Configure and Purge EdgeOne Cache
        env:
          TENCENTCLOUD_SECRET_ID: ${{ secrets.EO_SECRET_ID }}
          TENCENTCLOUD_SECRET_KEY: ${{ secrets.EO_SECRET_KEY }}
        run: |
          tccli configure set secretId $TENCENTCLOUD_SECRET_ID
          tccli configure set secretKey $TENCENTCLOUD_SECRET_KEY
          tccli configure set region ap-guangzhou
          tccli teo CreatePurgeTask \
            --ZoneId ${{ secrets.EO_ZONE_ID }} \
            --Type purge_prefix \
            --Method invalidate \
            --Targets '["${{ secrets.EO_DOMAIN }}"]'
7.3.2 配置仓库2的Action变量
- 🔧 配置指南
使用本 Action 前,你需要在 GitHub 仓库中配置以下 Secrets 和 Variables
必需的 Secrets
| Secret 名称 | 说明 | 如何获取 |
|---|---|---|
SERVER_IP | 你的阿里云服务器的公网 IP 地址 | 登录阿里云控制台 → 云服务器 ECS → 实例 → 查看公网 IP |
SERVER_USER | SSH 登录用户名 | 通常是 root(Ubuntu/CentOS 默认)或 ubuntu(Ubuntu 镜像默认) |
SERVER_SSH_KEY | SSH 私钥内容(完整内容,包括 -----BEGIN OPENSSH PRIVATE KEY-----) | 本地执行 cat ~/.ssh/id_rsa 复制全部内容;若没有,执行 ssh-keygen -t rsa -b 4096 生成,并将公钥 id_rsa.pub 添加到服务器的 ~/.ssh/authorized_keys |
EO_SECRET_ID | 腾讯云 API 密钥 ID | 登录腾讯云控制台 → 访问管理 → API 密钥管理 → 新建密钥或查看现有密钥 |
EO_SECRET_KEY | 腾讯云 API 密钥 Key | 同上,与 Secret ID 成对出现 |
EO_ZONE_ID | EdgeOne 站点的 Zone ID | 登录腾讯云 EdgeOne 控制台 → 站点列表 → 点击你的域名 → 在概览页面找到“Zone ID” |
EO_DOMAIN | 需要刷新缓存的域名(带 https://) | 你的网站域名,例如 https://www.example.com |
- 配置步骤
-
进入你的 GitHub 仓库 → Settings → Secrets and variables → Actions
-
点击 New repository secret,依次添加上述表格中的所有 Secrets:
Name Secret SERVER_IP123.456.789.0SERVER_USERrootSERVER_SSH_KEY-----BEGIN OPENSSH PRIVATE KEY-----\n...… … -
确保你的服务器已允许 SSH 密钥登录,并将公钥添加到
~/.ssh/authorized_keys
- 验证配置
配置完成后,推送一次代码到master分支,在 GitHub 仓库的 Actions 标签页查看运行日志,确认所有步骤均为绿色 ✅
08. 懒人部署
在你的开发文件夹中执行
powershell -Command "Invoke-WebRequest -Uri 'https://github.com/mete0rxsc/Mete0r-Tree-Hole/raw/refs/heads/master/01.%20%E5%8D%9A%E5%AE%A2%E7%B1%BB/%E6%95%99%E5%AD%A6/%E9%83%A8%E7%BD%B2.cmd' -OutFile '部署.cmd'"运行 部署.cmd
就可以自动推送到仓库1了
09. 添加友链页面
建议同步查看原作者xaoxuu对于友链的解释页面
- 创建
.\source\links\index.md文件,并添加如下内容:
---
title: 我的小伙伴们
date: 2077/12/30
update: 2077/12/30
keywords: 链接
description: 小伙伴们
---

可以一起交换友链!
想交好多好多的博友们!

{% friends posts:true api:你需要修改为你的API地址 %}

**申请前须知**

- 本站友链均为动态友链,页面加载后通过请求接口渲染出友链数据。
- 本站友链按最新一篇文章发布时间倒序排序,越活跃的博主就越靠前。
- 没有 feed 链接的可能会排在最后。
- 本站仅定期解析 feed 地址,不会爬取其它地址。

**自助友链申请流程**

1. 确保符合**安全合规**的硬性条件,且不会对本站进行高频爬取。
2. 提交友链意向申请,如实填写。(此时不必提前添加本站为友链)
3. 完成友链任务,未完成的不要随意勾选。(如果迟迟没有通过审核,请检查 issue 中列出的任务是否完成。)
4. 博主审核通过,此时请及时添加本站友链。

**提交完成后可以到此板块下方留言,这样可以有助于您提交的友链接更快的通过审核**


>我的友链:
-   "url": "",
    "avatar": "",
    "title": "",
    "description": "",
    "snapshot": ""
    "feed": ""

如果我的网站有什么不好的地方,还请您多多担待,指出我的错误我会及时修改的~
填写你的友链信息,我审核通过后会在网站展示你的友链~ -
搭建API服务
进入作者的仓库: xaoxuu/friends
点击Fork按钮,创建自己的仓库 ,记得打开 github action 的运行权限 -
修改
index.md中的API地址为Github仓库OutPut分支的地址
结语
这篇文章写作的初衷,是方便更多的新人朋友加入到我们博客圈大家庭
让大家相信,在各大平台兴起、信息愈发碎片化的当下,这个看似渐渐淡出人们视野的圈子里,依然有许多人在默默为爱发电
用 Hexo 搭建起一方属于自己的小天地,从来都不是一件复杂又遥远的事
它无关流量与热度,不必迎合算法与潮流,只是安安静静记录思考、分享热爱、留存时光
愿每一位愿意提笔、愿意搭建、愿意坚守的朋友,都能在这里找到同频的伙伴,让文字有归处,让热爱有回响
也期待越来越多新鲜的面孔加入进来,一起守护这份纯粹与真诚,让小小的博客世界,永远温暖、永远鲜活 、
评论区加载中...